Winter Woes: Frostbite on the Homestead
our Frostbite Struggle, Featuring Lucky
Winter on the homestead means cozy coops, extra straw and, for some of us, the annual battle against frostbite. If you’ve ever woken up to a rooster with blackened comb tips, this post is for you. I’ll share what frostbite looks like, how to care for it, and what I’ve learned the hard way from my own flock.
First, A Little Backstory
Sometimes, no matter how much we do to prevent it, frostbite still happens. The handsome rooster in the photos is our boy, Lucky – and unfortunately, he’s especially prone to frostbite.
We’ve tried everything. His comb isn’t particularly large (no bigger than some of our other roosters who’ve never had an issue), and yet he still ends up with frostbite. It doesn’t even have to be cold enough that you’d even expect frostbite to be an issue. Last winter, when we realized how sensitive he was, we added heat to his coop and kept it above freezing right through until spring. My best guess is that he just has poor circulation in his comb, it’s the only thing that makes sense at this point.
It absolutely breaks my heart to see him in pain, so this winter we’ve kept his coop heated again. Still, when a cold snap hit in early February, it was too much and poor Lucky ended up with frostbite again. Every other rooster? Perfectly fine. Lucky’s coop is draft-free, cleaned daily, and stays low-humidity. No water overnight. He even has a heater. We’ve done all the “right” things but, somehow, it still wasn’t enough.
If you’ve never had to deal with frostbite in your flock, I truly hope you never do. If you ever find yourself in the same boat though, I hope Lucky’s story helps you feel a little less alone and a little more prepared. It’s not easy sharing the parts of chicken keeping that make you feel like you’ve failed (and believe me, I feel like I’ve failed Lucky) but I’d rather share the hard lessons if it means helping someone else – even if it stings a bit to admit we’re still learning, too.
What Does Frostbite Look Like?
The photos below show the progression of Lucky’s frostbite, starting from the morning I first discovered it. At the time I’m writing this, he’s still healing, frostbite takes a long time to fully recover from, so I’ll continue to update this post as he improves.

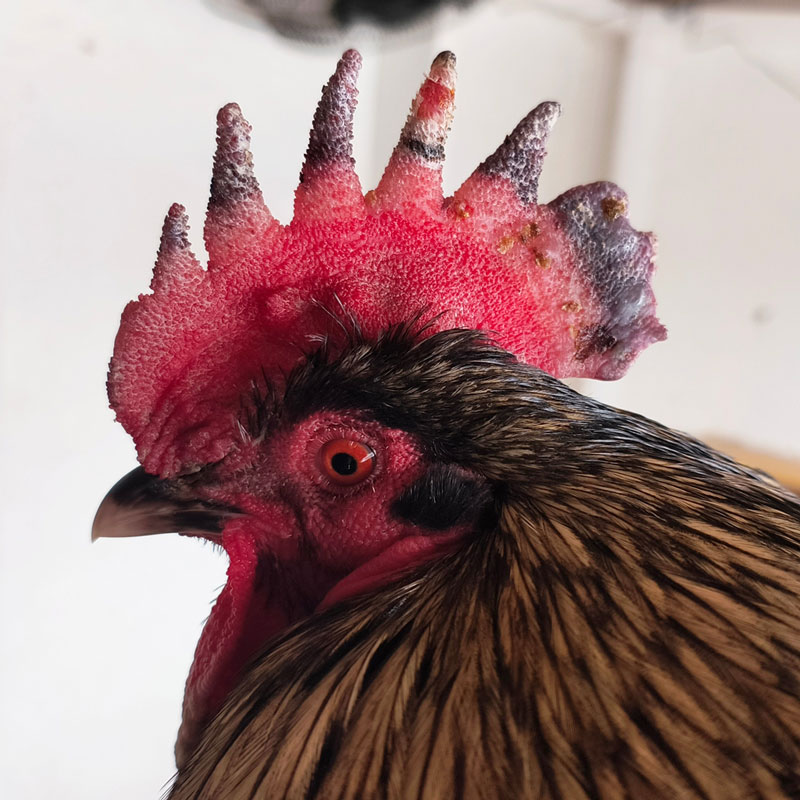
Photo 1: This was the morning I found it. You can see the damaged areas of his comb starting to turn purple. There was no swelling or blistering yet, just that distinct dark coloration – the first warning sign I had that something wasn’t right.

Photo 2: Three days later, things looked much worse. Lucky’s comb had swollen significantly, especially toward the back of his head. The swelling caused the skin to split, and he was bleeding from a few spots. Blisters had also formed by this stage. The crusty bits you see are from blisters that popped, and if you look closely, there are still a few intact ones toward the back. You can also see a pale line, white to light pink, just below the blackened area. That tissue was also damaged, though not as severely.
If you ever notice that pale pink or white color at the edges of a comb or wattles, that’s usually the very earliest stage of frostbite. If you catch it then and get your bird out of the cold, it will often heal completely before it worsens. Unfortunately for Lucky, this all happened overnight while we were asleep, and by morning it was already too late to stop it from progressing.
This stage looks awful (and yes, it’s painful for them), but it’s a normal part of the healing process and, as rough as it appears, things were going as expected.

Photo 3: Ten days in, the swelling and blisters were gone. There were still a few crusty patches on the back of his comb, but overall, things were starting to settle down.

Photo 4: Day fifteen brought some encouraging signs. The front of his comb had healed with no tissue loss, and the back had improved a lot, too. There are still a few spots that may not heal completely, but it’s looking far better than I first feared. The weather had finally warmed up above freezing, so Lucky was back outside, strutting around and soaking up some sunshine.

Photo 5: Twenty four days later. Still healing but getting better every day.

Photo 6: Lucky, all healed up, albeit with shorter points on his comb.
How To Treat Frostbite in Chickens
First, a quick disclaimer – I’m not a veterinarian. I’m just sharing what I’ve learned through experience and what has worked for us. Use this advice at your own discretion, and if you’re ever unsure, please check with a vet.
If your chicken develops frostbite and the tissue has already turned purple (like in Lucky’s Day One photo), there’s unfortunately not a lot you can do to reverse it. At that point, your main goal is to prevent further damage. Keep your bird warm enough to stop the frostbitten tissue from re-freezing, but warm them slowly. Never point a heater or hair dryer directly at the affected area – rapid heating can actually make things worse.
From there, your chicken’s body will take over the healing process. Your role is to keep them comfortable, monitor for infection, and make sure they’re safe and warm. Because frostbite often causes small breaks in the skin, infection is a real risk, especially since chickens aren’t exactly known for keeping things sterile.
Your bird will be in pain while they heal, so pain management is important. You can use over-the-counter pain medication that’s safe for chickens, or your vet can provide something specific. Lucky was on regular pain meds for about a week before he decided he’d had enough (because, of course, he did). I’m not listing exact medications or dosages here since I’m not a vet, but it’s worth discussing your options with your veterinarian.
When it comes to caring for the frostbitten areas, keep your hands off! Don’t touch, pick, or try to rub anything into the tissue. Skip the Vaseline, paw balm, or ointments that need to be massaged in. Just keep your chicken warm, dry, and stress-free, and let their body do the healing. You can use a gentle wound spray to help prevent infection, but make sure it dries completely before your bird goes back out into the cold. Never use products that contain alcohol, it will sting like crazy and cause even more pain.
Over time, the most damaged parts (the blackened areas) will die and eventually fall off. Don’t panic, that’s part of the normal healing process. The good news is that the black areas often shrink as healing progresses, so not everything that looks bad at first will be lost. In more severe cases, you might see a bit of permanent tissue loss, but many chickens bounce back looking surprisingly good.
Healing takes time – a lot of time. Mild frostbite might clear up in a few weeks, while more serious cases can take months. I expect it’ll be spring (April or May) before Lucky’s fully healed, and that’s okay. We’re taking it one day at a time, with plenty of treats along the way.
How Can I Prevent Frostbite
Frostbite usually shows up when it’s cold, damp, and drafty. The good news is, with a few coop tweaks and habits, you can greatly reduce the risk for your flock.
Start by making sure your coop is draft-free but well-ventilated. You want airflow up high to let moisture escape, but no cold breezes blowing directly on your birds. A good test? Go inside on a windy day, close the doors, and feel around for any sneaky drafts.
Keep water outside the coop whenever possible. Chickens don’t drink overnight, so having water inside only adds unnecessary humidity. If you need to bring water in during the day because they refuse to go out, just dump it or move it back outside at bedtime.
Humidity is the silent culprit behind a lot of frostbite cases. Clean the coop daily to remove droppings – chicken poop holds moisture, and that moisture builds up fast.
Space matters, too. Overcrowding = higher humidity. Make sure your coop is large enough for the number of chickens inside and that everyone has enough roosting space. No one should be left sleeping solo on the floor (they’ll miss out on that shared warmth).
To help prevent frostbitten wattles, use a waterer that doesn’t let your birds dip their wattles when drinking. If you’re using an open bowl, raise it so they reach over the edge instead of dunking into it – just make sure your shortest hen can still drink comfortably. Wattles can also get frostbitten from foraging in snow, so limit snowy adventures on especially cold days.
When it’s really cold, or the windchill is brutal, keep the flock indoors. They might not love being cooped up (pun intended), but it’s safer. Roosters, in particular, tend to stay outside longer than they should, “guarding” their hens even when they’re freezing. Since they generally have larger combs and wattles, they’re already at higher risk, and that loyal guardian behavior doesn’t help. Sometimes, the kindest thing you can do is simply not open the coop door in the morning.
Now let’s talk about coop heat – the most controversial topic in chicken keeping. You’ll hear plenty of “never add heat” advice out there and, clearly, I’m not going to tell you that. While your coop shouldn’t be toasty, a bit of supplemental heat can take the edge off when it’s dangerously cold. Aim to keep it around the freezing mark – warm enough to prevent damage, but not so warm that it causes condensation or dependency.
A radiant panel heater is one of the safest options and gives your flock a spot to warm up without major fire risk. Still, sometimes even that isn’t enough. Lucky’s coop had a panel heater, low humidity, no drafts, no water overnight, and he still got frostbite this year.
We’ve since added a ceramic heat emitter bulb in a heat lamp base (mounted securely to the ceiling in two different ways) above his roost to keep his comb warm while he sleeps. It’s been much more effective for him, though it’s considered less safe. To manage the risk, someone is always home when it’s on, there’s a smoke detector in the coop that alerts inside our house 24/7, and I check and clean the fixture daily. (It also means my husband and I haven’t gone anywhere together in weeks, but Lucky’s worth it.)
And finally, let’s talk about ointments and oils. You’ll often see advice online recommending Vaseline, lanolin, coconut oil, or paw balms like Musher’s Secret to prevent frostbite. In my experience, they don’t actually help. These products can act as a short-term barrier, but once they absorb, they stop doing anything useful. Worse yet, Vaseline can freeze and make frostbite more likely. If you want to use something, skip Vaseline and avoid anything water-based, they’re more likely to cause harm than prevent it.
Sometimes, despite doing everything “right,” frostbite still happens. If that’s the case, please know you’re not alone. Even with all the right precautions, Lucky still managed to prove that some birds are just more prone to it than others.
Feet and Toes Are at Risk Too!
Thankfully, this isn’t something we’ve had to deal with here (knocking on wood), but it’s worth mentioning – frostbite doesn’t just affect combs and wattles. A chicken’s feet and toes can also be at risk when the temperatures drop.
To help prevent frostbite on those little feet, make sure your flock has wide, flat roosts to settle on at night. This allows them to sit down and cover their toes with their feathers while they sleep, their natural way of staying warm. During the day, give them dry areas to stand that aren’t covered in snow or ice whenever possible. Even something simple like a bed of straw, wood shavings, or a few wooden pallets can make a big difference.
Lessons Learned (The Hard Way)
If there’s one thing Lucky has taught me, it’s that even when you do everything right, nature sometimes has other plans. You can have the perfect coop setup, the right humidity, no drafts, all the safety checks in the world, and frostbite can still happen. Some birds are just more prone to it, no matter what you do to prevent it.
Keeping animals means learning as you go, no matter how much research you did beforehand (and, believe me, I did plenty). You do your best, you adjust, and you try again a little wiser. You check on your flock a little extra when it’s bitterly cold, make changes when something doesn’t work, and own the tough parts right alongside the cozy, picture-perfect moments.
If sharing Lucky’s story helps even one chicken keeper catch frostbite early, then it’s worth every uncomfortable sentence and photo.
Here’s hoping next winter brings warm coops, healthy combs, and one very smug rooster who finally gets through the season frostbite-free.
Ask Away – I’ve Been There (Thanks, Lucky)
If you have any questions, please don’t hesitate to reach out. I’ve (unfortunately) learned more about frostbite than I ever wanted to thanks to Lucky but, if my experience can help someone else’s flock, I’m more than happy to share what I’ve learned.
About the Author
Hey! I’m Krystal - one of those quirky, super-introverted types in real danger of becoming a hermit. You know the kind. I usually leave the mountain once a week for provisions, load up on chicken feed, shavings, groceries, and whatever lumber I’ve convinced myself I need, then hurry back home where it’s quiet and a lot less people-y.
Turning our little property into a thriving homestead has become my passion (and maybe my obsession). If you happen to stop by, you’ll almost always find me outside doing something - building a new coop in the chicken village, tackling a half-finished project, tending the garden, doing chicken chores, or wrangling birds. On the rare chance you catch me indoors, I’m probably in the kitchen or knee-deep in sketches and plans for whatever I’ve decided to do next.
If you like what you see here, come hang out with me on Facebook and Instagram for more homestead stories, flock updates, and a good dose of cozy chaos.
Thanks for stopping by!